Moving Split Volume Groups
I recently had an issue with a Linux VM that was configured with LVM. The server had run out of space several times and each time it did someone simply added a new primary partition, formatted it to LVM and extended the logical volume. This was all well and good until the 3rd time the server ran out of space. We could no longer add any more partitions to the drive. Worse, the way the layout was done gparted was having issues even extending the existing partitions. For the sake of simplicity, I decided to just reconfigure the entire partition scheme back to a single partition to ease future growth. Luckily this can be done fairly easily with logical volume mirroring.
I re-created the scenario in my lab to test possible solutions. The following ended up working perfectly. In this example there are only three existing partitions but the same process could be used for more, even if the partitions are split across multiple physical drives.
Run pvs to see the current physical volumes:
# pvs

PV         VG     Fmt  Attr PSize  PFree
/dev/sda3  lvm-vg lvm2 a--   4.54g    0
/dev/sda4  lvm-vg lvm2 a--   4.46g    0
/dev/sda5  lvm-vg lvm2 a--  15.76g    0
As you can see, the volume group "lvm-vg" is split across three partitions (physical volumes or PVs) with no free space on any.
Add a second hard drive (this machine is virtual so it was trivial), and format with a single primary partition and LVM as the filesystem.

Now, back in the OS, the new disk shows up in the list of physical volumes but has not yet been added to any volume groups.
# pvs
  PV         VG     Fmt  Attr PSize  PFree
  /dev/sda3  lvm-vg lvm2 a--   4.54g     0
  /dev/sda4  lvm-vg lvm2 a--   4.46g     0
  /dev/sda5  lvm-vg lvm2 a--  15.76g     0
  /dev/sdb1         lvm2 a--  30.00g 30.00g
Use vgextend to add the new physical disk to the volume group.
vgextend lvm-vg /dev/sdb1
Now to convert the volume group "lvm-vg" to a mirrored volume. The command to this is lvconvert. Because all of the free space exists only on the new physical volume, that will be used as the mirror. Note that this will have to be done for each logical volume under the volume group. In my case, the root file system and swap. Each step takes quite a while as all data is mirrored.
lvconvert -m 1 /dev/lvm-vg/root
lvconvert -m 1 /dev/lvm-vg/swap_1
Once the mirror has been established, use lvconvert with with the -m 0 option, specifying which partitions are to be removed.
lvconvert -m 0 /dev/lvm-vg/root /dev/sda3 /dev/sda4 /dev/sda5
lvconvert -m 0 /dev/lvm-vg/swap_1 /dev/sda3 /dev/sda4 /dev/sda5
The output of pvs should now show the free space on the partitions that were removed.
# pvs

  PV         VG     Fmt  Attr PSize  PFree
  /dev/sda3  lvm-vg lvm2 a--   4.54g  4.54g
  /dev/sda4  lvm-vg lvm2 a--   4.46g  4.46g
  /dev/sda5  lvm-vg lvm2 a--  15.76g 15.76g
  /dev/sdb1  lvm-vg lvm2 a--  30.00g  5.24g
Now remove each of the partitions from the volume group entirely with vgreduce.
vgreduce lvm-vg /dev/sda3
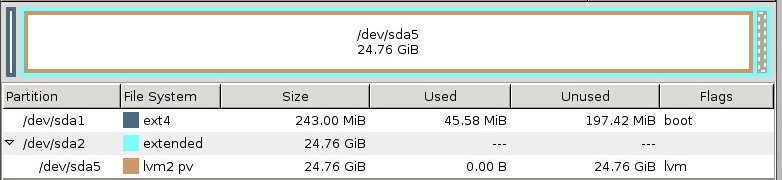
Re-partition the first disk in a more sane fashion. I did it in a gparted to be safe but everything could be done from fdisk within the live operating system. In the end, I ended up with an extended partition with a lvm formatted logical volume beneath it.
After the primary drive is done being partitioned, repeat the process to copy everything back to that volume then remove the staging drive. Now the system is on a nice continuous partition on a single drive that can be managed more easily moving forward. Make sure to resize the root filesystem once its in its final home.
Some pages that led me in the right direction:
Click to read and post comments